
In a world where digital communication and document management have become the norm, tools that simplify and streamline these processes are nothing short of a lifesaver. One such tool that has captured the hearts of many is “I Love PDF.” In this blog post, we will explore the features and benefits that make I Love PDF a go-to platform for individuals and businesses alike.
I LOVE PDF – Easy and Super Useful Tools For Converting Docs to PDF or Vice Versa
Why I Love PDF?
- User-Friendly Interface: The first thing that captivates users about I Love PDF is its intuitive and user-friendly interface. Whether you’re a tech-savvy professional or a casual user, navigating through the platform is a breeze. The clean layout and straightforward design make it accessible for everyone.
- Diverse Range of Tools: I Love PDF is not a one-trick pony. It offers a diverse range of tools catering to various document-related needs. From merging and splitting PDFs to compressing and converting files, I Love PDF is a comprehensive solution for anyone dealing with digital documents.
- Effortless File Conversion: Have you ever received a document in a format that doesn’t suit your needs? I Love PDF solves this problem seamlessly. Whether you need to convert Word documents to PDF, or vice versa, or even transform images into PDFs, the platform supports a wide array of file formats.
- Collaboration Made Easy: Collaborating on documents becomes a breeze with I Love PDF’s sharing and commenting features. Multiple users can work on a document simultaneously, making it an ideal choice for team projects or client collaborations.
- Security First: Understanding the importance of data security, I Love PDF ensures that your documents are handled with utmost care. The platform uses secure protocols for file transfers, and your data is treated with the confidentiality it deserves.
- Accessible Anywhere, Anytime: With the rise of remote work, the ability to access your documents from anywhere is crucial. I Love PDF operates on the cloud, allowing users to work on their documents from any device with an internet connection.
- Affordable Pricing: While many premium features are available for free, I Love PDF offers reasonably priced premium plans for those with more extensive document management needs. The pricing structure is transparent and caters to both individuals and businesses.
Conclusion:
In a world where time is of the essence, I Love PDF emerges as a superhero for document management. Its user-friendly interface, diverse tools, and commitment to security make it a beloved platform for individuals and businesses alike. So, if you haven’t explored the magic of I Love PDF yet, it’s time to dive in and experience the efficiency it brings to your digital document world. After all, who wouldn’t love a tool that simplifies their life?
How to Convert Word to PDF?
Converting a Word document to a PDF (Portable Document Format) can be done easily using various methods. Here’s a step-by-step guide on how to convert a Word document to PDF:
Method 1: Using Microsoft Word (Windows)
- Open your Word document:
- Launch Microsoft Word and open the document you want to convert.
- Click on “File”:
- In the top left corner, click on the “File” tab to open the backstage view.
- Select “Save As”:
- From the options on the left, choose “Save As.”
- Choose PDF as the file format:
- In the Save As dialog box, select the location where you want to save the PDF.
- Choose “PDF” from the dropdown menu next to “Save as type.”
- Click “Save”:
- After selecting PDF, click the “Save” button.
Method 2: Using Microsoft Word (Mac)
- Open your Word document:
- Launch Microsoft Word and open the document you want to convert.
- Go to “File”:
- Click on the “File” menu in the top-left corner.
- Select “Export”:
- Choose “Export” from the menu.
- Choose PDF as the format:
- In the Export Your Document window, select “PDF” as the format.
- Click “Save”:
- Choose the location where you want to save the PDF, enter a name, and click “Save.”
Method 3: Online Converters
- Use an online converter:
- There are several online platforms like SmallPDF, Adobe Acrobat, or Google Drive that allow you to convert Word documents to PDF.
- Upload your file:
- Visit the chosen online converter’s website and follow the instructions to upload your Word document.
- Convert and download:
- Once uploaded, click the conversion button, and the platform will process your document and provide a link to download the converted PDF.
Method 4: Dedicated Software
- Use dedicated software:
- There are various third-party software applications like Adobe Acrobat or other PDF converters that can be installed on your computer.
- Install and follow instructions:
- Install the chosen software and follow the instructions to convert your Word document to PDF.
Tips:
- Check formatting: After conversion, review the PDF to ensure that the formatting is retained.
- Security options: Some converters allow you to set password protection or other security features for the PDF.
Choose the method that suits your preferences and requirements
How to Convert Google Sheet or Excel to PDF?
Converting a Google Sheet or an Excel file to a PDF is a straightforward process. Here’s a step-by-step guide for both Google Sheets and Microsoft Excel:
Google Sheets:
- Open Google Sheets:
- Go to Google Sheets (sheets.google.com) and open the spreadsheet you want to convert.
- Click on “File”:
- In the top left corner, click on the “File” menu.
- Select “Download”:
- Hover over “Download” in the dropdown menu.
- Choose “PDF Document (.pdf)”:
- In the secondary menu, select “PDF Document (.pdf).” This will download your Google Sheet as a PDF.
Microsoft Excel:
Method 1: Using Microsoft Excel (Windows)
- Open your Excel file:
- Launch Microsoft Excel and open the spreadsheet you want to convert.
- Click on “File”:
- In the top left corner, click on the “File” tab.
- Select “Save As”:
- Choose “Save As” from the options on the left.
- Choose PDF as the file format:
- In the Save As dialog box, select the location where you want to save the PDF.
- Choose “PDF” from the dropdown menu next to “Save as type.”
- Click “Save”:
- After selecting PDF, click the “Save” button.
Method 2: Using Microsoft Excel (Mac)
- Open your Excel file:
- Launch Microsoft Excel and open the spreadsheet you want to convert.
- Go to “File”:
- Click on the “File” menu in the top-left corner.
- Select “Export”:
- Choose “Export” from the menu.
- Choose PDF as the format:
- In the Export Your Document window, select “PDF” as the format.
- Click “Save”:
- Choose the location where you want to save the PDF, enter a name, and click “Save.”
Tips:
- Check formatting: After conversion, review the PDF to ensure that the formatting is retained, especially if you have complex layouts or charts.
- Print settings: When converting Excel files, ensure that your print settings are appropriately configured, as they can affect the appearance of the PDF.
- Page layout: Confirm that the page layout in the PDF matches your expectations, especially if your spreadsheet spans multiple pages.
Choose the method that aligns with the platform you are using and your specific preferences. Converting to PDF is a useful way to share your data in a universally readable format
How to Convert CSV to PDF?
Converting a CSV (Comma-Separated Values) file to a PDF involves a few steps, and there are various methods you can use to accomplish this. Here’s a general guide:
Method 1: Using Microsoft Excel
- Open Microsoft Excel:
- Launch Microsoft Excel on your computer.
- Import CSV file:
- Click on “File” and choose “Open.”
- Browse and select your CSV file.
- Format the data (if necessary):
- If your CSV data needs formatting adjustments, make the necessary changes in Excel.
- Go to “File” and choose “Print”:
- Click on “File” and select the “Print” option.
- Select a PDF Printer:
- Instead of an actual printer, choose a PDF printer in the print settings. If you don’t have one installed, you can download and install a virtual PDF printer (like PDFCreator or CutePDF).
- Adjust print settings:
- Configure settings such as page orientation, size, and margins if needed.
- Click “Print” or “Save”:
- After configuring the settings, click “Print” or “Save,” and you’ll be prompted to choose a location to save your PDF file.
Method 2: Using Online Converters
- Choose an online converter:
- There are several online tools available that can convert CSV files to PDF. Examples include SmallPDF, Zamzar, or Online2PDF.
- Upload your CSV file:
- Visit the selected online converter’s website and follow the instructions to upload your CSV file.
- Configure settings (if available):
- Some online converters provide options to adjust settings. Configure these according to your preferences.
- Convert and download:
- Initiate the conversion process and, once complete, download the generated PDF file.
Method 3: Using Dedicated Software
- Use dedicated software:
- Consider using spreadsheet software or data processing tools that offer direct export to PDF. Many applications, including Microsoft Excel, LibreOffice Calc, or Google Sheets, allow you to save or export files as PDF directly.
- Import CSV and export as PDF:
- Open the dedicated software, import your CSV file, and use the software’s export or save functionality to create a PDF.
Tips:
- Check data integrity: Ensure that your CSV data is accurately represented in the PDF, especially if you’ve made any formatting adjustments during the process.
- Review PDF settings: Depending on the method you choose, review any available settings to ensure the PDF meets your requirements.
Choose the method that best suits your needs and the tools you have available. Whether using spreadsheet software, online converters, or dedicated applications, these methods offer flexibility in converting CSV files to PDF
How to Convert JPG to PDF?
Converting JPG (JPEG) images to PDF is a common task and can be done using various methods. Here’s a step-by-step guide using different approaches:
Method 1: Using Online Converters
- Choose an online converter:
- There are several online tools like SmallPDF, Adobe Acrobat, or Online2PDF that allow you to convert JPG to PDF.
- Upload your JPG files:
- Visit the selected online converter’s website and follow the instructions to upload your JPG images.
- Arrange images (if necessary):
- Some online converters may allow you to arrange the order of images. Adjust the sequence if needed.
- Configure settings (if available):
- Some converters provide options to adjust settings such as image compression or PDF quality. Configure these according to your preferences.
- Convert and download:
- Initiate the conversion process, and once complete, download the generated PDF file.
Method 2: Using Adobe Acrobat (Desktop)
- Open Adobe Acrobat:
- If you have Adobe Acrobat installed on your computer, open the software.
- Click on “File” and choose “Create”:
- In Adobe Acrobat, click on “File” and select “Create.”
- Choose “PDF from File”:
- Select “PDF from File” and navigate to the folder containing your JPG images.
- Select and arrange images:
- Select the JPG files you want to convert and arrange them in the desired order.
- Click “Open” and “Combine”:
- Once selected, click “Open” and then “Combine” to merge the JPG files into a single PDF.
- Save the PDF:
- After the combination is complete, save the PDF to your desired location.
Method 3: Using Preview (Mac)
- Open your JPG images with Preview:
- Locate your JPG files and open them with the Preview application on your Mac.
- Select all images:
- In Preview, select all the images you want to convert to a PDF.
- Click “File” and choose “Export as PDF”:
- In the “File” menu, select “Export as PDF.”
- Configure settings (if necessary):
- Adjust settings such as image quality or compression if needed.
- Choose a location and click “Save”:
- Select the location where you want to save the PDF and click “Save.”
Tips:
- Check PDF settings: Depending on the method used, review any available settings to ensure the PDF meets your requirements.
- Maintain image quality: Be mindful of any compression settings that may affect the image quality in the resulting PDF.
Choose the method that suits your preferences and the tools you have available. Whether using online converters, dedicated software like Adobe Acrobat, or native applications like Preview, these methods offer flexibility in converting JPG images to PDF
How to Merge PDF File?
ChatGPT
Merging or combining multiple PDF files into a single document can be done using various methods. Here’s a guide with different approaches:
Method 1: Using Online PDF Merging Tools
- Select an online tool:
- Choose a reliable online PDF merging tool like SmallPDF, Merge PDF, or PDF Merge.
- Upload your PDF files:
- Visit the selected tool’s website and follow the instructions to upload the PDF files you want to merge.
- Arrange PDF files (if necessary):
- Some online tools allow you to arrange the order of the PDF files. Adjust the sequence if needed.
- Configure settings (if available):
- Some tools may provide options to adjust settings such as compression or PDF quality. Configure these according to your preferences.
- Merge and download:
- Initiate the merging process, and once complete, download the merged PDF file.
Method 2: Using Adobe Acrobat (Desktop)
- Open Adobe Acrobat:
- If you have Adobe Acrobat installed on your computer, open the software.
- Click on “File” and choose “Create”:
- In Adobe Acrobat, click on “File” and select “Create.”
- Choose “Combine Files”:
- Select “Combine Files” and navigate to the folder containing your PDF files.
- Select and arrange files:
- Select the PDF files you want to merge and arrange them in the desired order.
- Click “Combine”:
- Once selected, click “Combine” to merge the PDF files into a single document.
- Save the merged PDF:
- After the combination is complete, save the merged PDF to your desired location.
Method 3: Using Preview (Mac)
- Open your PDF files with Preview:
- Locate your PDF files and open them with the Preview application on your Mac.
- Select all files:
- In Preview, select all the PDF files you want to merge.
- Click “File” and choose “Export as PDF”:
- In the “File” menu, select “Export as PDF.”
- Choose a location and click “Save”:
- Select the location where you want to save the merged PDF and click “Save.”
Tips:
- Check PDF settings: Depending on the method used, review any available settings to ensure the merged PDF meets your requirements.
- Maintain document order: Be mindful of the order in which you select or arrange the PDF files, as this determines the sequence in the merged document.
Choose the method that suits your preferences and the tools you have available. Whether using online merging tools, dedicated software like Adobe Acrobat, or native applications like Preview, these methods offer flexibility in merging multiple PDF files into a single document
How to Split PDF Files?
Splitting a PDF file into multiple documents can be done using various methods. Here’s a guide with different approaches:
Method 1: Using Online PDF Splitting Tools
- Select an online tool:
- Choose a reliable online PDF splitting tool like SmallPDF, Split PDF, or iLovePDF.
- Upload your PDF file:
- Visit the selected tool’s website and follow the instructions to upload the PDF file you want to split.
- Configure splitting options (if necessary):
- Some online tools allow you to specify criteria for splitting, such as page ranges or file size. Configure these according to your needs.
- Split and download:
- Initiate the splitting process, and once complete, download the split PDF files.
Method 2: Using Adobe Acrobat (Desktop)
- Open Adobe Acrobat:
- If you have Adobe Acrobat installed on your computer, open the software.
- Click on “File” and choose “Organize Pages”:
- In Adobe Acrobat, click on “File” and select “Organize Pages.”
- Choose “Split”:
- Select the “Split” option, and a dialog box will appear.
- Configure splitting options:
- Specify the criteria for splitting, such as the number of pages per document or specific page ranges.
- Click “Output Options” (optional):
- If needed, click on “Output Options” to choose a folder for the split files and adjust other settings.
- Click “OK” and then “Split”:
- After configuring the options, click “OK” and then “Split” to execute the process.
- Save the split PDF files:
- Save the split PDF files to your desired location.
Method 3: Using Preview (Mac)
- Open your PDF file with Preview:
- Locate your PDF file and open it with the Preview application on your Mac.
- Click “View” and choose “Thumbnails”:
- In the “View” menu, select “Thumbnails” to display the pages as thumbnails in the sidebar.
- Select pages to split:
- Click and drag to select the pages you want to split into a new document.
- Click “File” and choose “Export Selection”:
- In the “File” menu, select “Export Selection.”
- Choose a location and click “Save”:
- Select the location where you want to save the split PDF and click “Save.”
Tips:
- Check splitting criteria: Depending on the method used, review and ensure that the splitting criteria meet your requirements.
- Maintain original quality: Be mindful of the settings to ensure that the quality of the split PDF files is retained.
Choose the method that suits your preferences and the tools you have available. Whether using online splitting tools, dedicated software like Adobe Acrobat, or native applications like Preview, these methods offer flexibility in splitting a PDF into multiple documents
How to Compress PDF File?
Compressing a PDF file reduces its file size, making it easier to share or store. Here are several methods to compress a PDF file:
Method 1: Online PDF Compressors
- Choose an online compressor:
- Select an online PDF compression tool such as SmallPDF, iLovePDF, or PDF Compressor.
- Upload your PDF file:
- Visit the chosen tool’s website and follow the instructions to upload your PDF file.
- Configure compression settings (if available):
- Some online tools allow you to adjust compression settings. Common options include quality, resolution, or the level of compression applied.
- Compress and download:
- Initiate the compression process, and once complete, download the compressed PDF file.
Method 2: Using Adobe Acrobat (Desktop)
- Open Adobe Acrobat:
- If you have Adobe Acrobat installed on your computer, open the software.
- Click on “File” and choose “Optimize PDF”:
- In Adobe Acrobat, click on “File” and select “Optimize PDF.”
- Configure optimization settings:
- Choose the appropriate settings for compression, such as image quality, resolution, or font embedding.
- Click “OK” and save the optimized PDF:
- After configuring the settings, click “OK” to start the optimization process, and then save the optimized PDF to your desired location.
Method 3: Using Preview (Mac)
- Open your PDF file with Preview:
- Locate your PDF file and open it with the Preview application on your Mac.
- Click “File” and choose “Export as PDF”:
- In the “File” menu, select “Export as PDF.”
- Configure compression settings:
- Click the “Quartz Filter” dropdown menu to choose a filter that corresponds to the level of compression you desire. You can create a custom filter with specific settings.
- Choose a location and click “Save”:
- Select the location where you want to save the compressed PDF and click “Save.”
Tips:
- Check quality: While compressing, ensure that the compression settings do not compromise the quality of the PDF beyond acceptable limits.
- Backup original file: Before compression, consider creating a backup copy of the original PDF file in case you need the higher quality version later.
Choose the method that aligns with your preferences and the tools you have available. Whether using online compressors, dedicated software like Adobe Acrobat, or native applications like Preview, these methods offer flexibility in compressing PDF files to reduce their size
How to Convert PDF to Powerpoint or Vice Versa?
Converting PDF to PowerPoint (PPT) or vice versa involves different processes. Here are step-by-step guides for both conversions:
Convert PDF to PowerPoint:
Method 1: Using Adobe Acrobat (Desktop)
- Open Adobe Acrobat:
- Launch Adobe Acrobat on your computer.
- Click on “File” and choose “Export to”:
- In Adobe Acrobat, click on “File” and select “Export to.”
- Choose “Microsoft PowerPoint”:
- Select “Microsoft PowerPoint” as the export format.
- Select PPT as the output format:
- Choose the PPT format from the options.
- Configure settings (if necessary):
- Adjust settings such as layout, image quality, or other options based on your preferences.
- Click “Export” and save the PowerPoint file:
- Click “Export,” choose a location to save the PowerPoint file, and click “Save.”
Method 2: Using Online Converters
- Choose an online converter:
- Select a reputable online converter such as SmallPDF, Adobe Acrobat online, or Zamzar.
- Upload your PDF file:
- Visit the chosen online converter’s website and follow the instructions to upload your PDF file.
- Configure conversion settings (if available):
- Some online converters allow you to adjust settings. Configure these according to your preferences.
- Convert and download the PowerPoint file:
- Initiate the conversion process, and once complete, download the converted PowerPoint file.
Convert PowerPoint to PDF:
Method 1: Using Microsoft PowerPoint
- Open your PowerPoint file:
- Launch Microsoft PowerPoint and open the presentation you want to convert.
- Click on “File” and choose “Save As”:
- In the top left corner, click on the “File” tab and select “Save As.”
- Choose PDF as the file format:
- In the Save As dialog box, select the location where you want to save the PDF.
- Choose “PDF” from the dropdown menu next to “Save as type.”
- Click “Save”:
- After selecting PDF, click the “Save” button.
Method 2: Using Online Converters
- Choose an online converter:
- Select a reliable online converter like SmallPDF, Adobe Acrobat online, or Zamzar.
- Upload your PowerPoint file:
- Visit the chosen online converter’s website and follow the instructions to upload your PowerPoint file.
- Configure conversion settings (if available):
- Some online converters allow you to adjust settings. Configure these according to your preferences.
- Convert and download the PDF file:
- Initiate the conversion process, and once complete, download the converted PDF file.
Tips:
- Check formatting: After conversion, review the converted file to ensure that formatting is retained, especially for complex layouts, graphics, or animations.
- Interactive elements: Note that interactive elements in PowerPoint may not always be fully preserved when converting to PDF.
- File size: Be mindful of the file size, especially if you plan to share or distribute the converted files.
Choose the method that aligns with your preferences and the tools you have available. Whether using desktop applications like Adobe Acrobat or Microsoft PowerPoint, or online converters, these methods offer flexibility in converting between PDF and PowerPoint formats
How to Add or Remove Watermark in I LOVE PDF?
I LOVE PDF is an online platform that provides various tools for working with PDF files. While I don’t have real-time information about the platform’s current features, as of my last knowledge update in January 2022, here’s a general guide on how you might add or remove a watermark using I LOVE PDF. Keep in mind that the interface or specific steps may have changed, so it’s advisable to check the platform for the most up-to-date information.
Adding Watermark:
- Visit I LOVE PDF:
- Go to the I LOVE PDF website (https://www.ilovepdf.com/).
- Select “Watermark” Tool:
- Find and select the “Watermark” tool from the list of available tools.
- Upload Your PDF:
- Upload the PDF file to which you want to add a watermark.
- Configure Watermark:
- Follow the on-screen instructions to configure the watermark settings. This might include selecting the watermark text or image, adjusting transparency, and specifying its position on the page.
- Apply Watermark:
- Once configured, apply the watermark to your PDF.
- Download the PDF:
- After the watermark is added, download the modified PDF with the watermark.
Removing Watermark:
- Visit I LOVE PDF:
- Go to the I LOVE PDF website (https://www.ilovepdf.com/).
- Select “Watermark Remover” Tool:
- Find and select the “Watermark Remover” tool from the list of available tools.
- Upload Your PDF:
- Upload the PDF file from which you want to remove the watermark.
- Configure Watermark Removal:
- Follow the on-screen instructions to configure the watermark removal settings. This might include specifying the area where the watermark is located.
- Remove Watermark:
- Once configured, initiate the watermark removal process.
- Download the PDF:
- After the watermark is removed, download the modified PDF without the watermark.
Tips:
- Account Registration:
- Some features on I LOVE PDF may require account registration. Consider creating an account if you want to access additional functionalities.
- Check for Updates:
- As online tools may update their features, it’s advisable to check the I LOVE PDF website for any changes in the interface or additional tools.
Remember that the steps outlined here are based on the general functionalities expected from tools like I LOVE PDF, and the platform’s features may evolve over time. Always refer to the latest documentation or on-site instructions provided by I LOVE PDF for the most accurate and up-to-date information
How to Protect a PDF File?
Protecting a PDF file typically involves adding security measures to prevent unauthorized access, copying, printing, or editing. Here are steps you can take to protect a PDF file:
Method 1: Password Protection
- Open the PDF:
- Use Adobe Acrobat or another PDF reader to open the PDF file you want to protect.
- Click on “File” and choose “Properties”:
- In Adobe Acrobat, click on “File” and select “Properties.”
- Go to the “Security” tab:
- Navigate to the “Security” tab in the Properties dialog box.
- Select “Password Security”:
- Choose the option for “Password Security.”
- Enable password protection:
- Check the box that says “Restrict editing and printing of the document.”
- Set a strong password.
- Configure permissions:
- Specify the actions that require a password, such as printing, editing, or copying text.
- Click “OK” and save the changes:
- Click “OK” to close the Security Settings dialog box, and then save the PDF.
Method 2: Encryption and Certificate Protection
- Open the PDF:
- Use Adobe Acrobat or another PDF reader to open the PDF file.
- Click on “File” and choose “Properties”:
- In Adobe Acrobat, click on “File” and select “Properties.”
- Go to the “Security” tab:
- Navigate to the “Security” tab in the Properties dialog box.
- Select “Certificate Security”:
- Choose the option for “Certificate Security.”
- Enable certificate-based security:
- Select the option that allows certificate-based security.
- Configure permissions:
- Specify the actions that require a certificate, such as printing, editing, or copying text.
- Click “OK” and save the changes:
- Click “OK” to close the Security Settings dialog box, and then save the PDF.
Method 3: Watermarking
- Open the PDF:
- Use Adobe Acrobat or another PDF reader to open the PDF file.
- Click on “Tools” and choose “Edit PDF”:
- In Adobe Acrobat, click on “Tools” and select “Edit PDF.”
- Add a watermark:
- Choose the option to add a watermark, which can include text or an image.
- Configure watermark settings:
- Adjust the opacity, position, and other settings for the watermark.
- Click “OK” and save the changes:
- Once the watermark is added, click “OK” to close the Edit PDF tool, and then save the PDF.
Method 4: Online PDF Protection Services
- Select an online service:
- Use an online PDF protection service like SmallPDF, iLovePDF, or Adobe Acrobat Online.
- Upload your PDF file:
- Visit the chosen service’s website and follow the instructions to upload your PDF file.
- Configure protection settings:
- Many online services offer options for password protection and encryption. Configure these settings as needed.
- Apply protection and download:
- Apply the protection settings and download the secured PDF file.
Tips:
- Use Strong Passwords:
- If you’re setting a password, use a strong combination of characters to enhance security.
- Keep Backup Copies:
- Before applying protection, consider keeping a backup copy of the original PDF in case you need an unprotected version later.
- Check Compatibility:
- Ensure that the protection settings you apply are compatible with the PDF reader software used by your intended audience.
Choose the method that aligns with your security requirements and the tools you have available. Always check for updates in the interface and features of the specific PDF software or online service you are using, as these can evolve over time
How to Unlock a PDF File Using I Love PDF?
I LOVE PDF primarily provides tools for working with PDF files but may not explicitly offer features for unlocking or removing passwords from protected PDF files. However, the steps below are a general guide for unlocking a password-protected PDF file using various methods. Please note that these methods assume you have the legal right to access the file.
Method 1: Use the Password (if known)
- Open the PDF:
- Open the password-protected PDF file in a PDF reader like Adobe Acrobat.
- Enter the Password:
- When prompted, enter the correct password to unlock the PDF.
- Save an Unprotected Copy:
- After entering the password, save an unprotected copy of the PDF if allowed.
Method 2: Use Google Chrome
- Open Chrome Browser:
- Open Google Chrome and navigate to the location of the password-protected PDF file.
- Drag and Drop into Chrome:
- Drag and drop the PDF file into a new Chrome tab.
- Enter the Password:
- If prompted, enter the password to unlock the PDF.
- Print to Save an Unprotected Copy:
- Once the PDF is open, go to “File” > “Print” and choose the option to “Save as PDF” to create an unprotected copy.
Method 3: Use a PDF Unlocking Tool
- Select a PDF Unlocking Tool:
- Choose a reputable PDF unlocking tool like SmallPDF, iLovePDF (if it offers such a feature), or similar services available online.
- Upload the PDF:
- Visit the website of the selected tool, upload the password-protected PDF, and follow the instructions.
- Unlock the PDF:
- The tool may prompt you to enter a password if you have it. Alternatively, some tools may attempt to remove the password automatically.
- Download the Unlocked PDF:
- Once the unlocking process is complete, download the unlocked PDF.
Important Note:
- Legal Considerations:
- It is crucial to mention that attempting to unlock or remove the password from a PDF file without proper authorization is illegal. Only unlock files for which you have the right to access. Unauthorized access to password-protected documents may violate privacy and copyright laws.
Since features on online platforms can evolve, it’s recommended to visit the I LOVE PDF website or contact their support to check if they have introduced any features related to unlocking PDF files. Always respect legal and ethical considerations when dealing with password-protected documents
How to Repair a PDF File Using I Love PDF?
I Love PDF primarily provides tools for PDF manipulation and conversion but may not explicitly offer features for repairing or fixing corrupted PDF files. If there have been updates or changes to the platform since then, you may want to check the I Love PDF website or contact their support for the most up-to-date information.
That said, repairing a corrupted PDF file can be a challenging task, and success may depend on the extent of the damage. Here are some general methods you can try:
Method 1: Open and Save with Adobe Acrobat
- Open with Adobe Acrobat:
- Attempt to open the corrupted PDF file using Adobe Acrobat or Adobe Reader.
- Save As Another Copy:
- If the file opens, use the “Save As” option to save the PDF as a new copy.
Method 2: Use Online PDF Repair Tools
- Select a PDF Repair Tool:
- Choose an online PDF repair tool such as Repair PDF, PDF2Go, or similar services.
- Upload the Corrupted PDF:
- Visit the website of the selected tool, upload the corrupted PDF, and follow the instructions.
- Repair the PDF:
- The online tool may attempt to repair the PDF automatically.
- Download the Repaired PDF:
- If the repair is successful, download the repaired version of the PDF.
Method 3: Use PDF Recovery Software
- Select PDF Recovery Software:
- Choose a reputable PDF recovery tool such as Stellar Repair for PDF, DataNumen PDF Repair, or similar software.
- Install and Run the Software:
- Download and install the selected PDF recovery software on your computer.
- Select the Corrupted PDF:
- Open the software and select the corrupted PDF file for recovery.
- Initiate the Recovery Process:
- Follow the software’s instructions to initiate the recovery process.
- Save the Recovered PDF:
- If the software successfully recovers the PDF, save the repaired file.
Important Notes:
- Backup Original File:
- Always make a backup copy of the original corrupted PDF file before attempting any repair methods.
- Legal Considerations:
- Ensure that you have the right to repair and access the content of the PDF file. Unauthorized access to protected or sensitive documents may violate privacy and copyright laws.
Keep in mind that not all PDF files can be successfully repaired, especially if the corruption is severe. If the document contains critical information, and the above methods fail, you might consider reaching out to professional data recovery services for assistance
OCR PDF Feature
I Love PDF provides an OCR (Optical Character Recognition) feature that allows users to convert scanned images or PDFs with images into searchable and editable text. OCR technology recognizes text in images, making it possible to extract and work with the text content in a PDF. Here’s a general guide on how to use the OCR feature in I Love PDF:
OCR PDF with I Love PDF:
- Visit the I Love PDF website:
- Go to the I Love PDF website (https://www.ilovepdf.com/).
- Access the OCR tool:
- Look for the OCR tool in the list of available tools. The placement of tools may vary, but OCR is typically found in a section related to PDF editing or conversion.
- Upload your PDF file:
- Click on the OCR tool and upload the PDF file containing scanned images or non-searchable text.
- Configure OCR settings (if available):
- Depending on the platform, you might have options to configure OCR settings, such as choosing the language of the text.
- Initiate the OCR process:
- Start the OCR process by clicking on the corresponding button or option. I Love PDF will analyze the PDF, recognize the text in the images, and convert it into searchable and editable text.
- Download the OCR-processed PDF:
- Once the OCR process is complete, download the PDF file with the searchable and editable text.
Tips:
- Supported Languages:
- Ensure that the OCR tool supports the language of the text in your scanned images. Some OCR tools may have language-specific capabilities.
- Quality of Scanned Images:
- The quality of the OCR results can be affected by the clarity and resolution of the scanned images. Higher-quality scans generally produce better OCR results.
- Editing Capabilities:
- After OCR processing, you can typically use text editing tools to make changes to the recognized text in the PDF.
- Check File Size:
- Be mindful of the file size, especially if the original scanned images were high-resolution. OCR processing can increase the file size.
Please note that the exact steps and features may evolve over time, and it’s advisable to check the I Love PDF website or documentation for the most up-to-date information on their OCR feature. Always respect privacy and copyright laws when working with documents that may contain sensitive or copyrighted content
iLovePDF Desktop: Download the iLovePDF Desktop App for seamless PDF management on your Mac or Windows PC. This lightweight application empowers you to handle resource-intensive PDF tasks offline, ensuring quick and efficient processing of your documents.
iLovePDF Mobile: Experience on-the-go document management with the iLovePDF Mobile App. Whether you’re using an Android or iPhone device, turn your smartphone into a versatile PDF Editor & Scanner. Annotate, sign, and share documents effortlessly, providing flexibility and convenience.
iLoveIMG: Explore iLoveIMG, the web app designed for bulk image modifications at no cost. Crop, resize, compress, convert, and more – all the essential tools to enhance your images are conveniently available. With iLoveIMG, you can achieve image modifications with just a few clicks, simplifying the image editing process.
Trusted PDF Software: Discover iLovePDF, the PDF software trusted by millions of users worldwide. Whether you’re a professional handling extensive document workflows or an individual user, iLovePDF offers a comprehensive suite of tools for seamless PDF editing.
Effortless PDF Editing: iLovePDF stands as your go-to web app for editing PDFs effortlessly. With a user-friendly interface, you can access a wide range of tools that cater to your specific PDF editing needs. From merging and splitting to compressing and converting, iLovePDF has you covered.
Enhanced Efficiency: Enjoy all the tools you need to work efficiently with your digital documents. iLovePDF streamlines your PDF editing tasks, allowing you to accomplish more in less time. Whether you’re collaborating on a project, annotating documents, or organizing files, iLovePDF provides the features necessary for enhanced productivity.
Data Security: While enjoying the convenience of iLovePDF, rest assured that your data is kept safe and secure. The platform prioritizes the protection of your sensitive information, providing a reliable environment for working with confidential documents. Experience the ease of use without compromising on security
The iLovePDF team is dedicated to simplifying document management, understanding the challenges of dealing with PDF files. With a vision to optimize your time and eliminate PDF-related stress, our journey began in Barcelona in 2010.
Founding Principles:
Born out of a personal need, our mission has always been to provide a free, accessible, and high-quality service. We envisioned an easy-to-use platform that caters to diverse global needs, evolving into one of the most visited PDF websites.
Expanded Services:
To enhance our offerings, we’ve developed two additional applications. The iLovePDF Mobile App facilitates on-the-go PDF modifications, while the iLovePDF Desktop empowers users to process files offline.
Commitment to Users:
Your challenges became our motivation. A small yet passionate team of developers works tirelessly to ensure an enjoyable editing experience. Solving every PDF problem is our commitment to you.
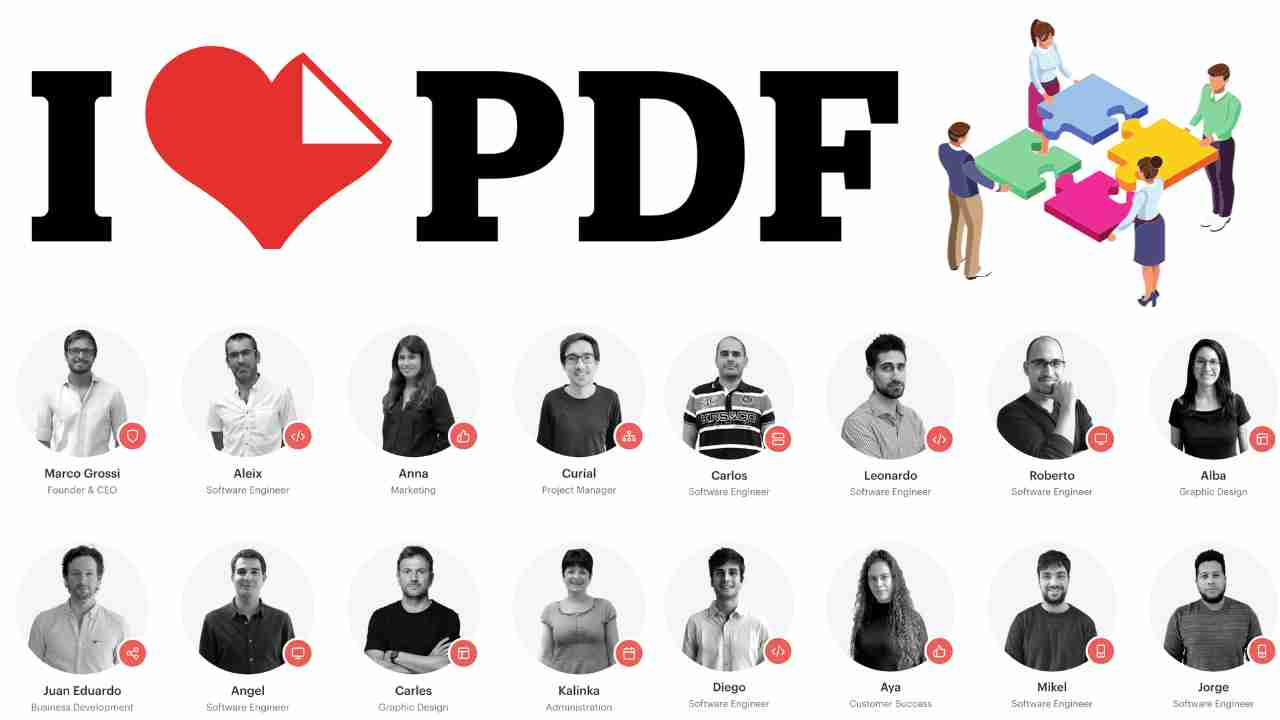
The Team
Marco Grossi – Founder & CEO:
Leading the team with a vision to revolutionize PDF management, Marco Grossi brings a wealth of experience.
Diverse Talents:
Our team comprises software engineers like Aleix, Juan Eduardo, and Angel, ensuring a diverse skill set. From graphic design (Carles, Alba, Arnau) to marketing (Anna, Laura, Tom), each member contributes uniquely.
Customer Success & Support:
Dedicated to your satisfaction, Aya, Dominic, Daniela, and Miriam focus on customer success, ensuring your needs are met.
Project Management & Administration:
Curial and Wladi manage projects, while Kalinka oversees administration. Iva handles office management.
Business Development & Legal:
Juan Eduardo and Thatiana contribute to business development, while Juan Oriol manages legal aspects.
HR & Localization:
Laura handles HR responsibilities, and Miriam serves as Localization Manager.
Sales:
Imane leads our sales efforts, connecting with users around the world.
Ongoing Innovation:
With software engineers like Sergio, Mikel, Jorge, Guillem, Alex, Sergio, Jakob, Vlad, and Diego, continuous innovation is at the core of our mission.
Diversity & Inclusion:
Our diverse team, including members like Carlos, Leonardo, Alvaro, and Imane, reflects our commitment to inclusivity.
Conclusion:
The iLovePDF team, fueled by passion and innovation, is dedicated to providing solutions for millions globally. Your document needs inspire our continuous efforts to evolve and improve our services
Success Story of I Love PDF
Unveiling the Success Story of iLovePDF: Revolutionizing Document Management
In the dynamic world of digital innovation, success stories often emerge from a blend of passion, vision, and a commitment to solving real-world challenges. One such remarkable tale is that of iLovePDF, a platform that has become synonymous with seamless document management. Let’s embark on the journey of iLovePDF and explore the key elements that have propelled it to success.
Inception and Founding Principles:
iLovePDF’s story begins in 2010, nestled in the vibrant city of Barcelona. Founded by Marco Grossi, the platform was conceived out of a personal need to simplify the complexities of working with PDF files. From the outset, the goal was clear – to offer a free, accessible, and top-quality service that is not only easy to use but also addresses the time-consuming nature of dealing with PDFs.
From Personal Need to Global Community:
What started as a personal project soon transformed into a global community. iLovePDF rapidly gained traction, evolving into one of the most visited PDF websites globally. Users around the world found solace in a platform that understood their struggles and offered effective solutions.
Diverse Offerings to Meet Varied Needs:
Understanding that user needs are diverse, iLovePDF expanded its services. The iLovePDF Mobile App allows users to modify PDF files on the go, while the iLovePDF Desktop caters to those who prefer processing files offline. This versatility and adaptability have been instrumental in accommodating a wide range of user preferences.
User Challenges as Motivation:
The turning point in iLovePDF’s journey was the realization that every PDF problem presented an opportunity. The small yet passionate team of developers took on the challenge, committing to providing users with an enjoyable editing experience. User challenges became the driving force behind the platform’s continuous evolution.
Team Dynamics and Expertise:
Behind iLovePDF’s success is a team of diverse talents. From software engineers and graphic designers to marketing professionals and customer success specialists, each team member plays a unique role. Marco Grossi, the Founder & CEO, leads the team with a vision to revolutionize PDF management.
Commitment to Innovation:
The success of iLovePDF is deeply rooted in its commitment to innovation. A team of dedicated software engineers ensures that the platform stays at the forefront of technological advancements. Continuous improvements and updates reflect iLovePDF’s determination to provide cutting-edge solutions.
Global Outreach and Inclusivity:
With users from all corners of the globe, iLovePDF has become a symbol of global connectivity. The platform’s commitment to inclusivity is mirrored in its diverse team, representing various backgrounds and perspectives. The inclusivity extends to the features developed, ensuring that iLovePDF caters to a broad user base.
Looking Towards the Future:
As iLovePDF’s success story unfolds, the journey continues. The platform remains dedicated to enhancing user experiences, solving more PDF problems, and adapting to the ever-changing landscape of digital document management.
In conclusion, iLovePDF stands as a testament to the power of innovation, user-centric design, and a passionate team. It’s a success story that inspires us to navigate the complexities of the digital world with a spirit of creativity and determination. The journey of iLovePDF is a reminder that sometimes, the most impactful solutions emerge from addressing our own needs and, in turn, benefiting a global community
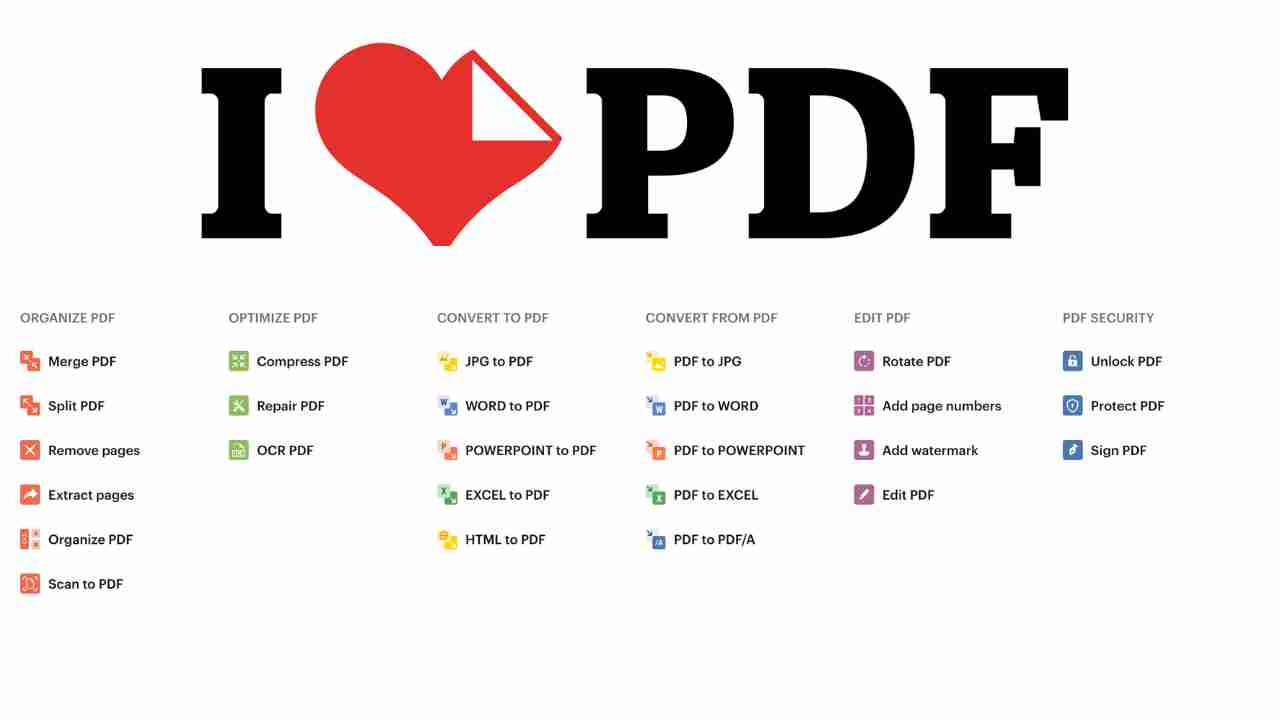
An elaboration on each tool available in iLovePDF:
Organize PDF:
- Merge PDF:
- Combine multiple PDF files into a single document, streamlining your data and improving document organization.
- Split PDF:
- Divide a PDF file into separate pages or extract specific pages, enabling focused sharing or rearrangement.
- Remove Pages:
- Trim unwanted pages from a PDF document, allowing you to tailor content to your specific needs.
- Extract Pages:
- Isolate and extract specific pages from a PDF file, offering flexibility in content extraction.
Optimize PDF:
- Compress PDF:
- Reduce the file size of a PDF, making it easier to share and quicker to load without compromising on quality.
- Repair PDF:
- Attempt to fix issues in a corrupted PDF file, ensuring data integrity and preserving your document.
Convert To PDF:
- Word to PDF:
- Transform Word documents into PDF format, preserving formatting and ensuring universal compatibility.
- Excel to PDF:
- Convert Excel spreadsheets into PDF files, maintaining the structure and layout of your data.
- PowerPoint to PDF:
- Change PowerPoint presentations into PDF format, securing your content for sharing or distribution.
- Image to PDF:
- Combine multiple image files (JPG) into a single PDF document, facilitating image-to-PDF conversion.
- HTML to PDF:
- Convert HTML web pages into PDF format, capturing the content and structure of the web content.
- Scan to PDF:
- Directly convert scanned documents into PDF, allowing you to digitize physical documents efficiently.
Convert From PDF:
- PDF to Word:
- Extract text and images from a PDF file and convert it into an editable Word document.
- PDF to Excel:
- Transform PDF tables into editable Excel spreadsheets, preserving the tabular structure.
- PDF to PowerPoint:
- Convert PDF presentations into PowerPoint slides, facilitating easy content reuse.
- PDF to Image (JPG):
- Extract images from a PDF document and convert them into JPG format.
- PDF to HTML:
- Transform PDF content into HTML format, enabling web-based sharing and presentation.
- PDF to PDF/A:
- Convert PDF files to the PDF/A format, ensuring long-term preservation of electronic documents.
Edit PDF:
- Rotate PDF:
- Adjust the orientation of pages within a PDF document, improving readability.
- Add Page Numbers:
- Sequentially number pages within a PDF file, enhancing document organization and navigation.
- Edit PDF:
- Make textual and visual edits directly within a PDF document, offering a range of editing capabilities.
PDF Security:
- Protect PDF:
- Set passwords and permissions to control access to your PDF files, enhancing document security.
- Unlock PDF:
- Remove passwords from protected PDF files, allowing for unrestricted access.
- Sign PDF:
- Add digital signatures to PDF documents, ensuring document authenticity and integrity.
- Add Watermark:
- Overlay text or image watermarks onto a PDF, providing additional branding or security.
Each tool in iLovePDF serves a specific purpose, collectively offering a comprehensive suite for PDF management, conversion, and optimization. Whether you need to merge, split, compress, convert, or secure PDFs, iLovePDF provides a user-friendly platform for efficient document handling.